I was so angry at how much I'd messed up every step of the cake on Friday that I marched back to the grocery store on Monday morning to buy more hazelnuts and try again.
And I still didn't buy enough hazelnuts! Turns out hazelnuts are not as heavy as I think they are, and they're also a little expensive. But I hedged my bets this time by also acquiring some hazelnut butter, in case my food processors were unable to handle trying to grind hazelnuts into a paste, especially at the small quantities used in the recipes. So I ground the 160g of roasted hazelnuts for the dacquoise first, and hoped I would be able to caramelize an adequate amount for the praline to be sweet enough.
But considering how delicious the cake was on Friday despite my mistakes, I was looking forward to doing it much better this time. I duly grabbed my candy thermometer and food processor from storage to try and do things right this time around.
I started by heating the sugar and water like the recipe called for, and brought it to the soft ball stage of 244deg F before adding the hazelnuts. The sugar was bubbling but still clear, and it did in fact crystalize immediately once I tossed the crushed nuts in. Because I was planning to make Paris-Brest later this week, I increased the amount of hazelnuts in this to allow myself some extra praline for that recipe later, rather than making a half batch for it alone.
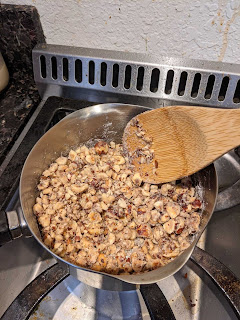 |
Chopped hazelnuts and the sugar which crystallized upon contact around the hazelnuts
|
After a few more minutes of stirring vigorously over low heat to make sure the sugar and hazelnuts did not burn, the sugar was caramelized and starting to create a sticky coating around the hazelnut bits. Eventually, even the largest pieces had their crystallized sugar turn into a caramel coating.
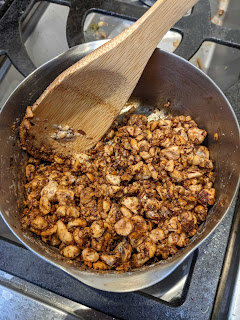 |
Eventually the sugar turned to a caramel that coated the nuts, but I stirred frequently because the edges threatened to burn.
|
I poured these out onto a quarter sheet pan to let them cool. Notice the immediate difference between my last batch of clumpy, sticky hazelnuts, and these caramelized hazelnuts that scattered easily on the pan and were not so much as tacky to the touch once they cooled. Instead, they had a pleasant sweet crunch and nuttiness of toasted hazelnut inside.
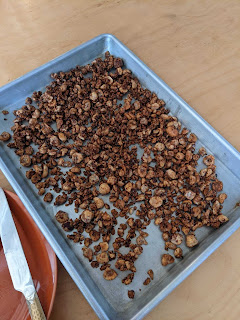 |
These hazelnuts were easy to spread out and cool, compared to the clumpy, sticky mess of last time
|
I tossed a few of these into my smaller, faster food processor, and made up the rest of the weight difference in the praline paste called for in both this recipe and that of the Paris-Brest using hazelnut butter from my bulk grocery store. It mostly turned into a smooth paste this time, though there were still visible bits of hazelnuts. I've made peanut butter from roasted peanuts in this food processor before but I presume I was using a larger quantity of peanuts, so maybe I should just look up the shelf life of homemade praline and make a bigger batch to save some for later recipes.
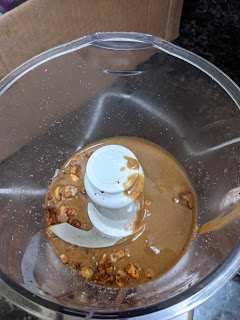 |
Cheating here with some hazelnut butter in addition to the candied hazelnuts
|
I brought back the bowl of ground hazelnuts and almond flour that I set aside at the beginning of the recipe, and began whipping the egg whites to stiff peaks.
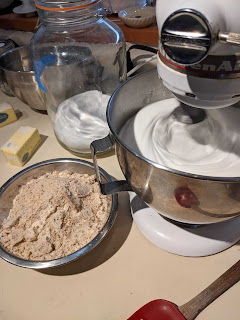 |
The correct ground hazelnuts this time with almonds, while the stand mixer does its thing to the egg whites
|
I poured the ground nuts in to fold with the completed meringue (you can tell how stiff the peaks are by the little stalagmite I accidentally built when tapping the whisk attachment on the edge of the bowl).
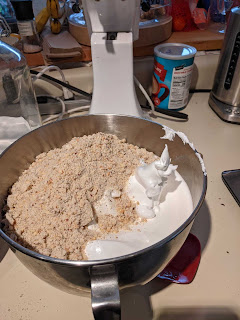 |
Preparing to fold the nuts in for the dacquoise
|
When preparing the cake layers this time, I decided to skip straight to spreading instead of the potentially-deflating step of putting it into a piping bag and realizing I didn't have enough batter to fill the sheets. I globbed half of the batter in three blobs along the center line of the sheet and spread it out until it was roughly a centimeter in even thickness. This left me with dimensions about an inch short of the edge of the parchment on all sides, so I estimated my final cake would probably be around 13"x9".
 |
I spread the batter out starting from the center and stopping when it was uniformly 1cm thick or so. I'm not sure how people square up the edges of the cake, though I guess it doesn't really matter since the rectangle is used to cut it to size anyways.
|
While the first layer of the cake was baking, I started preparing my buttercream. My photos get a little sparse at this point, partially because I had already done this once before, and partially because this familiarity allowed me to work efficiently in 7-8 minute bursts between rotating and swapping out the cake layers. I'm glad I already made this before and was not so concerned about the sugar syrup creation because the candy thermometer helped me keep a hand free.
I finished baking the cakes and set them on racks to cool, and I turned my full attention to the buttercream, which at this point was still in separate components of an Italian meringue and the egg yolks that had just whipped to a pale, thick cream.
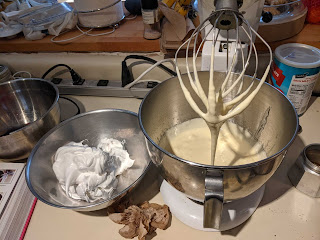 |
Italian meringue on the left, egg yolks whipped with hot sugar syrup until pale and ribbony on the right
|
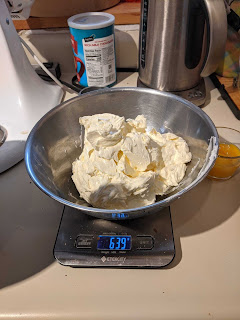
I did remember to soften the butter this time, so I whipped it in short order and added the egg components as well, beating after each addition. As I was reading some other sections of The Book, I noticed that it mentioned that buttercream should be beaten at medium speed for quite some time after incorporating the last of the egg whites, in order to achieve the most airy texture. Armed with this knowledge and the experience of little deflation the last time I made this, I whipped on medium for a little longer until the color of the buttercream was quite pale and it was very fluffy. Because this recipe uses 3/4 of a batch of buttercream, and the Paris-Brest requires 400g (almost half a batch), I figured the quarter batch left from last time + half of this batch would be enough for the dacquoise, so I went ahead and set aside 400g for the other recipe. Buttercream apparently freezes well, and just needs to be thawed in the fridge and rewhipped before using, so off to the freezer with this small bowl.
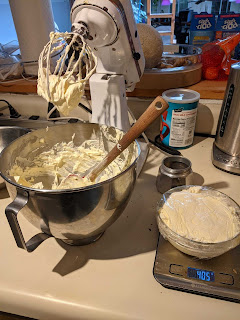 |
Whipped buttercream, setting some aside for the Paris-Brest I plan to make later this week
|
The remaining buttercream was not quite 750g, so I guess I must have used more than estimated on the last version of this cake. Nonetheless, I whipped in the praline (after setting aside another portion of the praline for the Paris-Brest mousseline). I'm sure 100g of buttercream would not break the cake's flavor.
 |
How do raw ingredients translate into weight? I may never get this right.
|
Indeed, the final size I was able to cut from the cakes was about 12.5"x9.5". The edges of the cake continue to baffle me; even though they did not seemed burned, the edges were far crisper than the insides (which were moist and almost gummy when being cut). The cake was definitely lighter than last time and not as flat, though it still was deflated in comparison to when it was first put in the oven (though I think this is just how this cake is). I plopped the buttercream down onto the bottom cake layer in the cake rectangle and spread it around.
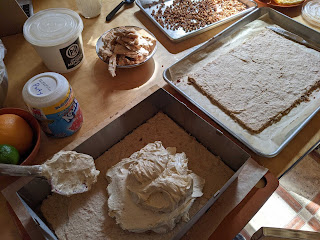 |
Spreading the praline buttercream onto the bottom cake layer
|
Here are the candied hazelnuts sprinkled atop the cake. Slightly less ground-beefy, but I don't think it can be helped. Brown crumbles = visual meat.
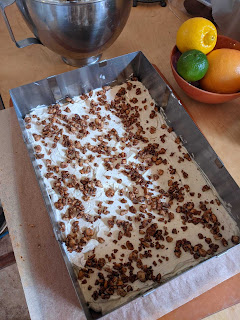 |
I would have liked to have more hazelnuts, but I had to save some for the garnish so this layer was not the most densely-strewn
|
Now here was a little trick. Remember the last time I made Succes Praline, and the top layer of the cake began to tear in a few places while transferring over to the cake rectangle? This time, I got clever.
I extended the cake rectangle slightly to make sure the top layer of the cake would fit with ample clearance on all sides, and then, with a quick "I hope this works," I grabbed one edge of the top layer parchment, slipped my other hand under the layer, and flipped it upside down into the cake rectangle. The cake remained adhered to the parchment, much to my relief! The parchment overlapping on the edge of the rectangle allowed me some purchase as I gently pressed the cake layer down into the rectangle to nestle against the buttercream, and when all the edges were aligned, I snugged up the edges of the rectangle against the cake again. When I began to peel off the parchment, the cake threatened to stick, so I used my offset spatula and set it on the parchment as I peeled against it at an acute angle, akin to the Unmolding Cakes parlor trick. When I met resistance in the middle, I started at another corner/edge, and eventually all the parchment came off. This had the added benefit of a relatively smoother surface atop the cake as a finish.
 |
Successfully demolded the top layer of cake into the pan intact!
|
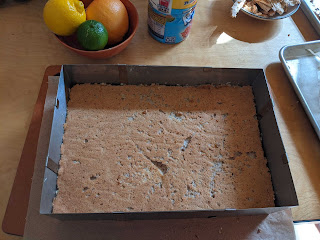
It was time to demold and sprinkle with powdered sugar! I only did one dusting of sugar last time, remembering how sweet the cake was. It is important to pull the cake rectangle upwards while demolding instead of outwards; the buttercream wants to stick to the rectangle, and the edges are cleaner if I pull directly up. I also compressed the cake rectangle lightly like last time to square up the edges a bit before demolding. Then the cake went off to the fridge to wait for the buttercream to set after a few hours.
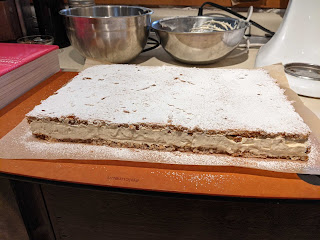 |
A nice square cake.
|
At this point, my house had not even finished eating the last batch of cake from Friday, despite having had a party in the meantime and my having given away several pieces of cake. I had to call up some more friends to take away cake pieces. This is where I ran into an unexpected issue: the correctly caramelized hazelnut crunch was less sticky and just rolled around when I sprinkled them on as garnish. They fell off readily and were very difficult to transport. I don't think anyone cared, but it is a useful note for the future to perhaps sprinkle them on a dollop of piped buttercream or something, or otherwise only serve this cake when no travel is involved.
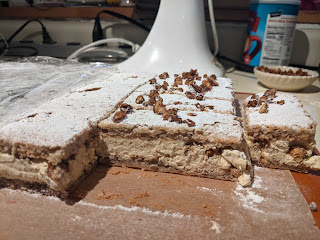 |
This one was much easier to cut into tidy slices.
|
Successful glamour shot! You can see that the cake layers are both thicker than last time and less dense. Additionally, the caramelized hazelnuts were delightful pockets of melty nuttiness amid the lightly flavored buttercream (which was lighter than last time, but not by that much). I think last time's cake was still tasty but very different, and while I consider it to be worse, I'm not sure that would be a fair axis to even judge it on.
 |
Glorious cross-section!
|
I don't have that many thoughts to add this time because it's already my second time doing this recipe. But nonetheless:
- Someone mentioned having more hazelnuts inside the cake would be nice! I think they were a highlight of the cake for many people.
- I found another website that stated their cake also came out to 13"x10", so I don't feel bad about the way I spread out the dacquoise batter.
- I'm slowly but surely changing people's minds on cake/buttercream because of the lightness of the French rendition of both.
- This cake is gluten free!
- I think this cake is supposed to be served fairly cold (it says to remove from the fridge ten minutes before serving) and I agree that the melt-in-your-mouth disappearing act of the buttercream is less pronounced when the cake is closer to room temperature. I have a hard time communicating this to people though, because when it is completely cold, it is somewhat unpleasant as well.
- Apparently these cakes can be frozen quite well? I know what I'm going to do when we replace our broken fridge/freezer...
Quote of the day: "I did this in 2 hours and 45 minutes! I could be on a bake-off!" -me and my infinite hubris.
No comments:
Post a Comment