Since the previous recipe contained a fair amount of hazelnuts and originated the hazelnut praline in this recipe, I decided it would be reasonable to do this one immediately after to decrease making small batches of niche ingredients.
The Paris-Brest is a circular choux ring that is covered in almonds and filled with praline cream of some sort. The pastry was commissioned to commemorate the Paris-Brest-Paris bicycle race, which is a long-distance race between the two cities and back, and the circular shape of the pastry is meant to evoke a bicycle wheel. Variations in the filling are common, ranging from diplomat cream (stabilized whipped cream) to pure buttercream and everything in between, though the praline (caramelized hazelnut) is a typical base flavor. The version in The Book uses a mousseline cream, which is what you call buttercream + pastry cream + a flavoring (in this case, praline).
The choux recipe was identical to that of the St Honore gateau from about a week ago. I'm sure y'all are sick of watching me make choux pastry by now, but I assure you, there is a twist this time! Two, in fact! Only one was intentional, alas. The first was that, while the recipe called for 125g of water, I decided to use 25g of whole milk and 100g of water, so that the choux would be more flavorful and tender, especially since I messed up and didn't thaw out the buttercream the night before so I would have to wait to the next day to assemble the pastries. The second twist is that you might notice that those three eggs in the background look mighty small. (Also pictured: my slapdash 70mm/3in round cutter that I 3D printed to eventually make marks on a floured baking sheet as a guide for piping the choux rings).
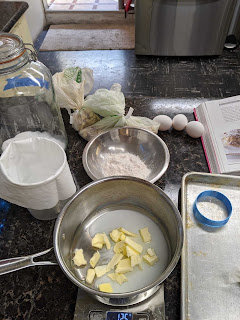 |
Choux pastry prep once again! Trying my theory of a small quantity of milk for flavor/tenderness with a majority of the liquid being water for a taller pastry
|
Those slightly smaller eggs (I have a feeling they were medium, instead of large) meant that I ended up using almost four eggs in the choux batter before it became glossy and fell from my spatula. I was really concerned that this meant that I had overcooked the flour ball before adding eggs, and that my choux would be too eggy, but I'm confident in retrospect that it was simply due to the smaller size of the eggs.
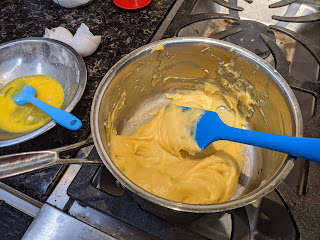 |
This choux batter required nearly four of the medium eggs I had on hand, as opposed to the 2+ the recipe called for.
|
I floured and buttered two baking sheets, and used the circle cutter to make round marks in the sticky flour to use as guidelines for piping the choux with the 8mm tip. After seeing results that some people had online, I was generous in my piping, but I think I didn't realize The Book wanted me to use the circles as an outer-border, rather than to pipe directly on the diameter. There's an anecdote about ID vs OD vs centerlines in mechanical design in here...
So, I was a little alarmed at how large and skinny the rings were, but there was nothing to be done about it now. I brushed them lightly with the remainder of my egg wash, and sprinkled them liberally with sliced almonds. I found out it was really hard to aim where I was sprinkling the almonds, and I ended up with a lot more on the pan than I intended, even having to go back for a second pass in some areas. The Book says that this is likely to happen and to not be alarmed, because one is to til the baking sheet and tap off the excess almonds. I was convinced this would make my choux run everywhere, but much to my surprise, when I tilted the pan until it was about 10 degrees from vertical and tapped firmly, the extra almonds fell off and slid to the bottom edge, while my choux rings were now unveiled in their almond-covered glory!
 |
Tilting and tapping the pan worked shockingly well to get rid of excess almonds
|
I set the first pan of eight rings into the oven to bake (no convection fan, as you may recall for choux) for about 24 minutes, while I piped the remainder of the batter. The Book says this recipe makes 20 rings; I ended up with just shy of fifteen, though smaller rings might have made this closer to the actual expected quantity.
 |
This is the second sheet of piped choux, for a total of 14.9 rings.
|
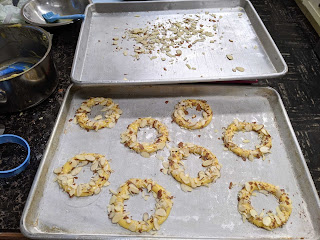
Here is the first batch of choux rings out from the oven. As you can see, they rose but not dramatically like puffs, and this is due to the surface-area-to-volume difference. I was somewhat chagrined that they were more like rings and less like chubby donuts, but I guess they look more like wheels this way. I set them on a rack to cool, and when both batches were sufficiently cool, I put them in airtight containers to fill the next day.
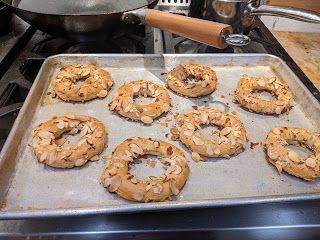 |
The first batch of choux rings, fresh from the oven. They have not risen as much as I would have liked, but I think this is in part due to my piping large rings that are less full in general.
|
The next day, I prepared a third of a full recipe of pastry cream for the mousseline. This is another one of those things I might stop documenting, because it's going to keep happening the exact same way and I don't plan on making any alterations to this recipe. I was originally skeptical of the cornstarch because it tends to be a little gelatinous or, in the worst case, chalky tasting, but it's proven itself to be a fine addition to the recipe and I have no improvements in mind. I spread this between layers of plastic wrap in a quarter sheet pan to chill in the fridge.
 |
Another familiar photo of pastry cream. I should make a library of stock pastry photos
|
I brought out the choux rings I had baked the day before and set about splitting them in half. A bagel cutter would have destroyed these guys; they'd softened a bit in storage and were now very tender. I don't understand why The Book insists on using a "sharp finely serrated knife" for cutting pastries; any sawing motion with a serrated knife would have made these tear. Instead, I used my all-purpose sharp chef's knife, and was overall pleased at how cleanly I was able to cut through even the almond slivers, with minimal almond detritus lost from the rings.
The photo below shows a ring from the second batch above, and from the first batch below. As is the case with most of my choux bakes, resting the batter prior to baking seems to make for a higher choux with less spread, but the shell on the unrested batch is noticeable thinner and there are fewer membrane partitions within the choux itself (not a huge issue for puffs, but noticeable here).
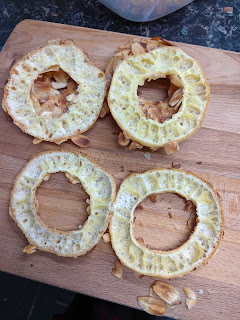 |
The top photo is from the second batch which rested for the additional 25 minutes while the first batch was baking. The bottom is the first batch, which went into the oven immediately and experienced slightly more spread but also has a thinner wall with fewer sub-pockets.
|
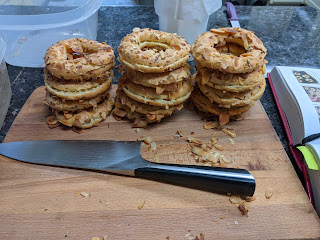
Here is a photo of all my sliced choux rings, and evidence of how few almond flakes I lost in the process! Shout out to this chef's knife, which I've had for nearly a decade now and has served as my daily driver for countless cooking adventures. I only personally own two knives: this one, and a Chinese cleaver that I used more when I cooked meat. Find yourself a man who can do it all in the kitchen.
 |
"Baconeggncheese." "Sir, this is a Wendy's amateur pastry kitchen."
|
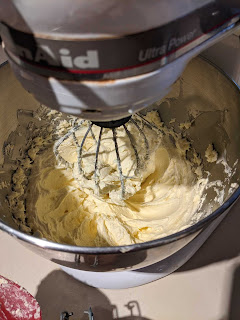
By this time, I assumed the pastry cream had chilled enough for me to start whipping the thawed buttercream. The Book states to do this on medium speed for ten minutes. I found that it had largely reached steady state by about 6 minutes, but kept whipping because I was still waiting for the pastry cream to completely cool.
 |
Re-whipped the reserved buttercream from the batch I made for the second attempt at Succes Praline
|
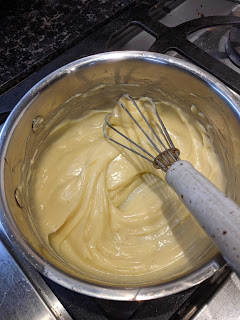
Finally, I whipped in the pastry cream. The cream became a little grainy at this point, even after about two minutes of whipping, but the addition of the hazelnut praline drizzled in actually helped the mousseline cohere and become smoother. Here is the final texture that I achieved, somewhere slightly past a soft peak.
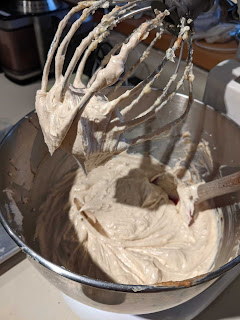 |
Mousseline made from whipping the chilled pastry cream into the buttercream and then adding the praline paste
|
Remembering that the heat from my hands made the St. Honore Chiboust cream progressively more difficult to pipe, I only put half of the mousseline into the piping bag to pipe the first batch of choux rings.
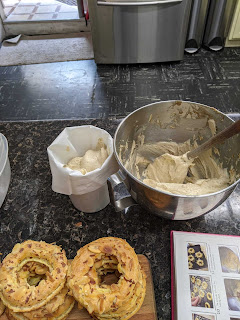 |
I only put half of the mousseline into the piping bag at a time to keep the heat from my hands from making it too runny while I piped.
|
This is perhaps the fourth or fifth ring that I piped; I was unable to completely replicate the pattern the book uses, but I definitely improved over the course of the piping. I did find it difficult to keep it even around the ring; I tried to rotate the ring as I piped instead of needing to reverse directions as I moved my hand around the ring, but this became difficult to avoid touching the already piped cream.
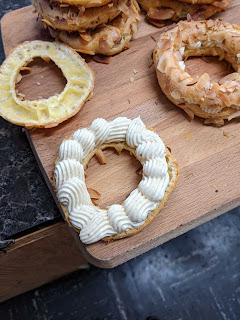 |
My piping was not half bad!
|
Here is one of the Paris-Brest assembled by gingerly laying the top back onto the piped mousseline!
 |
Abusing the heck out of the portrait mode on my phone
|
One last touch by sifting powdered sugar over the top, and my first attempt at Paris-Brest was complete. I put them in the fridge to chill, because the mousseline was quite soft at this point.
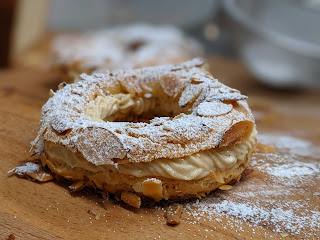 |
There it is!
|
Bonus: Dolled-up fairy bread I had for lunch, using leftover hazelnut mousseline, naturally colored sprinkles, and the Shokupan I baked yesterday ("oh, I'm only doing half of my pastry recipe and the weather is nice so I have time to bake fancy bread that takes four hours and needs to rise multiple times").
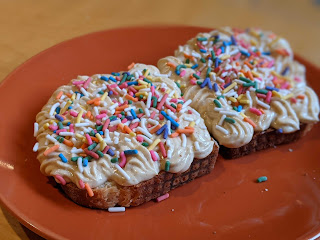 |
This is a balanced lunch, right? There's...at least three food groups.
|
Thoughts:
- I think the choice to sub in some milk in the choux recipe was the right call. While this made the texture even less crisp the next day than it already was from being a day old, the sweetness of the mousseline, while light, needed some additional counterpoint from the pastry itself so it wasn't just overwhelmingly nutty from the almond and hazelnut.
- People liked the lightness of the pastry! I think its appearance, with the sprinkled sugar and generous layer of cream, belies the airiness of the choux and the mousseline. It looks like it will be similar to a cannoli or ice cream sandwich in density, but is then surprisingly delicate.
- I am likely to try this recipe again soon and pipe the correct diameter circles, just to see whether the end result will look more impressive when they are compact instead of thin and large. I also wonder if stepping it up to the 10mm round piping tip would help get the full ring aspect ratio. I noticed in the photos in The Book that the splitting cut is actually closer to the top third of the choux rings, which would make a fuller choux bake necessary.
- Large eggs! Always! No other size will quell the voice of doubt in my head!
- This praline mousseline might have been one of my favorite things I've made recently. It's hard to top buttercream and pastry cream, but the combination of all with the praline was just delicious.
- I need to find a way to give these away if I'm to make them again. Finding fridge space to chill these in a single layer until the mousseline was set required a fair amount of creativity.
- I should have trusted my instincts with the mousseline being a little too soft to pipe cleanly. I think I should have chilled it a little bit more after whipping all ingredients together, perhaps even rewhipping if necessary. I have always seen Paris-Brest with sharp, star-tip piped cream, and I think colder cream would make this better. The other option, as The Book mentions, is to omit the pastry cream, which yields a stiffer mousseline.
- I should have been more liberal in piping the mousseline. Part of the appeal of the Paris-Brest is the impressive height of the filling (and thus calories!) and I found that my mousseline began to sink into the holes into the choux pastry rings, yielding a thinner mousseline layer than visually expected. I also had a fair amount of mousseline left (enough for the fairy bread, and then some to pipe into my slovenly waiting mouth in a dark corner of my kitchen).
- On my second to last choux ring, I ran into the unfortunate issue of an unground chunk of hazelnut clogging my straight star tip (sometimes called a French star tip). I prodded it a bit and was able to rotate it to clog my tip less so I could still pipe, albeit with fewer nice star ridges, but I'm not really sure how to fix this problem as it arises in the future. Maybe there isn't a better way to deal with it except to decant the cream and unclog the tip and refill the piping bag. Or, of course, just grinding the crap out of the praline beforehand to avoid the situation entirely. At least my piping bag didn't explode as the pressure increased.
Quote of the day: "Why do mine look like bagels?" "Hanging out with too many jews." - me complaining about the shape of my choux rings and a (Jewish) friend's text response
No comments:
Post a Comment