So, I'm a little early on this because St. Honoré’s feast day is on May 16, but this seemed like a good recipe to try due to my previous logic that a lot of good fruit ingredients are not in season yet, I had a small amount of puff pastry still left from my first batch, and this "cake" is more like a composition of puff pastry, choux pastry, and caramelized sugar, filled with pastry cream, and thus a good bridge as I transition from making small pastries into the cakes.
St Honore is the patron saint of bakers and pastry chefs, who did some miracles in French lore, and this cake is apt because of its composition, which showcases several french pastry basics: puff pastry/lamination, choux pastry, pastry cream, caramel, and meringue. The presentation varies, but these components are always somewhere included, and there is an additional traditional component: The St Honore piping tip. This tip is used to create the elegant waves in the Chiboust (combination pastry and meringue) cream filling, and the shape is something like a quenelle with a mohawk. After reading reviews that most people liked the medium sized 882 tip from Ateco, but not wanting to make a web order for a single piping tip, I decided to use my 3D printer to print a piping tip.
Typically, 3D printing for foodstuffs is not recommended without some careful surface finishing of the final product. This is not due to material safety issues; PLA is PolyLactic Acid and a popular material for compostable plastic dishware, and PETG is similarly food-safe. Rather, the nature of FDM printing and other layered 3D printing methods creates a surface texture of fine ridges, which can trap food particles despite cleaning and cause eventual problems with bacterial growth and other sanitation woes (especially since most FDM plastics are chosen for their low melting point for extrusion and are thus sensitive to high-heat and cannot be industrially sanitized). Various sites recommend sanding and sealing with a food-safe epoxy for 3D printed food instruments. As a piping tip is fairly thin and delicate, and I was planning to add this tip to a future website order, I decided it would be safe to create this tip and leave it unfinished because I was using it as a one-time stopgap measure.
I fired up Solidworks and, after making some quick estimations based on the dimensions of my existing piping tips and scaling the features according to photos of the tip I found online, I modeled the tip with a 1.2mm wall thickness and saved it as an .STL for printing, which you can find on Thingiverse here I will post once their email confirmation link stops leading me to a 500 Internal Server Error. I'll update the model once I buy the actual tip and can take some measurements, since the only tip model I could find online was not the shape I wanted. I printed this tip with a .15mm layer height (a little shy of the 0.1mm ultradetail mode) to see how it would come out, in a blue silk PLA. The finish was pretty good, so I decided to just roll with this one.
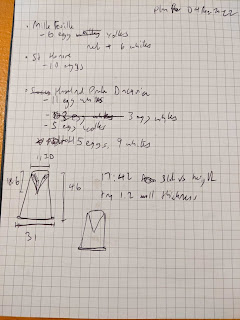 |
Calculations for the diameter and length of the piping tip opening thanks to holding my calipers up to the image of a St Honore tip on my computer screen and calculating the appropriate scale to match one of my plain piping tips
|
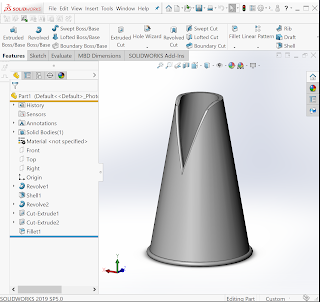 |
Quick 5 minute construction in Solidworks (you can tell that this, as opposed to baking, is my actual job that people pay me money to do)
|
The recipe for the choux pastry this time differed from those on the tarts in my earlier posts in that it only contained water as a liquid, rather an equal parts water and whole milk. There was also significantly less salt than sugar. I melted the butter with the above in a saucepan and stirred in the flour when it was fully melted, and I noticed that it took this flour a much longer time to cook dry. It's worth mentioning that my flour was different than my usual baking flour; I decided that I was using enough raw materials that I had to stop shopping for flour and eggs at my organic coop grocery store and buy from a big chain store instead, and I think this flour brand was just slightly less fresh. But it did still come into a ball eventually, and I cooked it until it left a thin film around the saucepan.
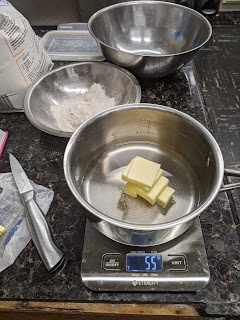 |
Butter, water, salt, sugar, and flour for the choux, with marked omission of milk
|
I beat two eggs into the choux, and then titrated the third egg in until the batter was glossy and fell in one glop from the spoon, leaving the V-shape on the spoon.
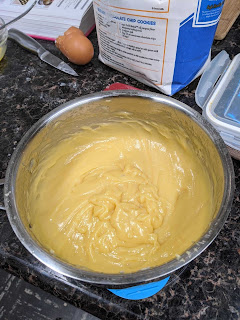 |
This is a very glossy choux batter! So shiny!
|
I prepared two quarter-sheets for the choux puffs by buttering lightly and then dusting with flour, but I found that, only using a conservative half of the batter for this step to make sure I had enough for the cake rims later, that I only used up one sheet. I piped the puffs pretty small (around 3/4" each) so they had a little room to spread to their full inch size, and I was aiming for a few more than the 13 I counted in the photos in The Book. I applied a little egg wash from the convenient remainders of the third egg that did not get incorporated into the choux batter, which I think I'm also improving on applying more delicately with a silicone brush than I was before, and popped them into the oven with the convection fan off for about twenty minutes.
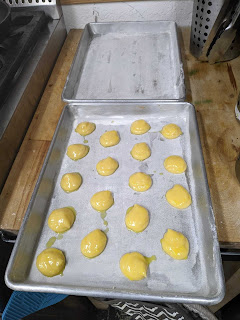 |
Piped small choux puffs on a quarter sheet and dabbed them lightly with egg glaze
|
Meanwhile, I didn't take photos of how I rolled out the puff pastry, but there's plenty of content on the blog about that before this. I knew it would shrink a little, so, in order to aim for the 10" final diameter, I actually rolled it out to 12", after a fair amount of resting between rolls. I cut off the meager scraps and dusted them with sugar, and pricked holes in the puff pastry circle. I used the remaining choux batter to pipe two concentric circles around the puff pastry, one on the rim and one about halfway to the center. I had a little bit of choux left over and piped them into small puffs on the borders, and dusted them with sugar as well to see what would happen.
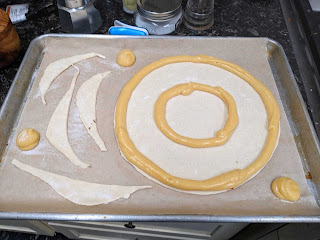 |
Puff pastry rolled out to 12" diameter circle with piped choux borders, along with extra puff pastry and choux scraps
|
By this time, the batch of choux puffs was ready to leave the oven. These turned out really well! They are orb-like with shiny golden egg-washed tops, slight crackled surfaces with (almost) no holes in the membrane, are hollow all the way, and have little to no deflation. I think the extra fat content from the milk in the previous recipe might have made for a more tender puff but were then unable to achieve the same lift and cracking as in this water-only recipe. I also think the buttering-and-flouring the sheet pans kept them from spreading quite as much, though I am not as certain on this part.
 |
Now this is the shape I am looking for in choux puffs!
|
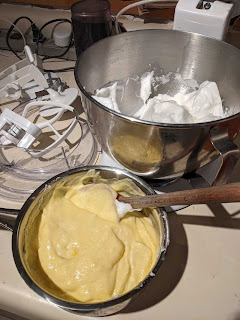
While the puff pastry and choux base were baking, I began making the Chiboust cream. I separated out the egg whites into the bowl of my stand mixer, and the egg yolks into the mixture of sugar and cornstarch that The Book uses for pastry cream. I am so grateful that this recipe uses all five eggs it calls for in its totality, instead of leaving me with more odd quantities of whites or yolks in my freezer.
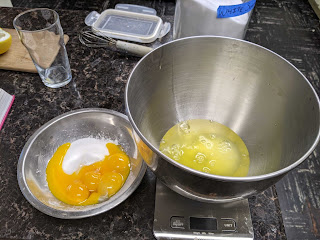 |
Look at those big ol' egg yolks from conventional eggs
|
I added about two teaspoons of vanilla bean paste to the milk for the pastry cream and set it to simmer in a saucepan on the stove. Meanwhile, I measured out 5g of gelatin sheets (I think the sheets I bought in Germany are a little smaller than the French regulation, so instead of just using 3 sheets, I added them by weight) and immersed them in a bowl of water to soak for about 10 minutes while I finished the pastry cream.
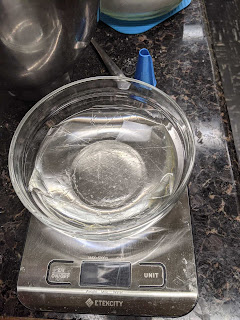 |
Gelatin sheets having a soak in some cool water
|
I think the egg yolks from my hippy coop are smaller than the ones in the big store, and I think the latter are more akin to what The Book uses. Every time I've made pastry cream thus far, the instructions state to whisk the mixture until the sugar just dissolves, but up until now, the mixture has been very thick and hard to even incorporate/whisk. But this time, the egg yolks, though much paler than those from the organic farm, were able to whisk the sugar into a silky liquid that maps well to the photos of this step in The Book.
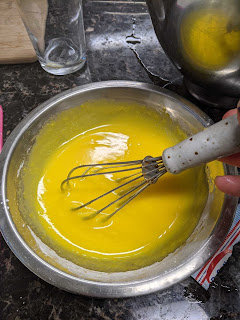 |
Apparently it's supposed to look like this every time? I never managed to dissolve the sugar in the egg yolks before.
|
I might have mentioned before that I've found one of the telltale signs that my pastry cream is close to thickening is the foam from whisking beginning to dissolve and the yellow cream color starting to peek through the surface. Here's a shaky-one-handed video of that point in the process; you can see the foam pulling away from the edges and eventually dissolving altogether and the pastry cream begins to thicken shortly thereafter. The video is cut short because I had to grab the pan off the heat and start whisking hard to prevent lumps once it began to thicken.
The last step to preparing the pastry cream was to whisk in the gelatin sheets that were soaked earlier. To drain them, you grab them from the water and squeeze them, and while I was scared they would dissolve and fall apart, they remained intact with no sign of breakage, although the rubbery squeaky feeling of squeezing the water out of them was distinctly unpleasant. I whisked them into the hot pastry cream, where they became invisible immediately and I had to keep whisking for a few minutes just to make sure they had completely dissolved because I had no way of seeing if that was the case!
Here, I committed the cardinal sin of choux pastry: I opened the oven. I was scared, you see, that the puff pastry scraps and extra choux puffs would brown too quickly. In retrospect, I should have just baked them on a separate sheet after. But, as you can see in the next photo, the primary reason choux deflates is being allowed to decrease in temperature before the dough matrix has fully set in its steam-inflated shape. So, despite my haste in popping the sheet back in the oven after I removed the extraneous pastries, the damage was done, and my puffed choux rings deflated. Fortunately, they do not require filling with cream in the recipe, so while this was a sacrifice of some volume and texture, it ultimately did not affect the structure of the cake that they became flat. I did notice that my puff pastry did not brown as much as in the book, though this may well also have been due to the mid-bake removal.
Another interesting thing I noticed was that while the puff pastry shrank predictably to almost exactly the 10" diameter called for in the original recipe (I'm glad I decided to roll out an inch of extra on all sides), the puff pastry ring did not shrink alongside the base! So the puff pastry, once deflated, kind of made an extra half inch border of its own extending outside the puff pastry. I'm sure this would be less obvious if it hadn't deflated, but I do think it would become the outside border of the pastry nonethless.
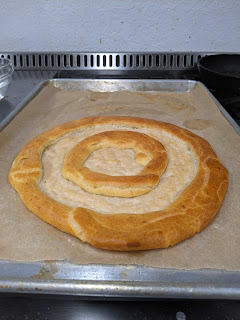 |
Sadly deflated choux rings on the puff pastry base. I baked this without convection fan on, thinking that it was better to not risk the choux deflating, but I guess it happened anyways due to my poor judgement
|
I set the pastries all aside to cool, and started whipping the egg whites to a soft peak in my stand mixer at medium speed. While I was waiting for the approximately 10 minutes it would take to do this, I inserted my 3D printed St. Honore tip into a plastic bag and filled it with leftover matcha pastry cream from the napoleon earlier, in order to practice piping with the tip. I found it fairly intuitive to use, although it got noticeably less sharp waves once the pastry cream started warming up more in my hands. I've heard that pastry schools also instruct students to practice piping with margarine; I might just keep this pastry cream in my fridge for the next week and keep reusing it to practice piping.
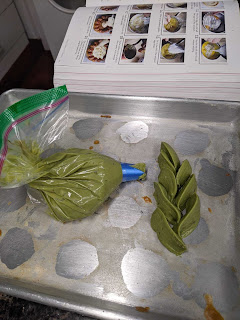 |
Practicing piping using the St Honore tip and a lazy ziploc piping bag with the leftover matcha pastry cream from the napoleon
|
Once the egg whites got to soft peaks, I increased the speed and began whipping for about 8 minutes until they got to a stiff peak (as seen in the photo below, a little spiky point is distinctly held on the end of the whisk attachment even after turning it right side up). I think I am on the cusp of overbeating at this point, actually, since you can see the small blob of coagulated egg white on the side of the whisk. But, as this was my first time doing this, I wanted to err on the side of too much volume rather than too little structure
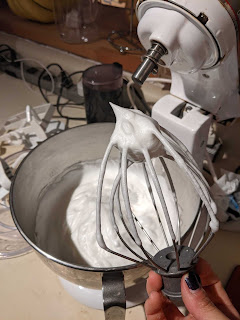 |
A very stiff peak on the end of my whisk attachment. I can't imagine doing this without a stand mixer.
|
I folded about a third of the egg whites into the big bowl of pastry cream. This is done as a sort of sacrificial portion of egg white, because it will deflate a lot but makes the cream lighter and more liquid such that folding in the rest of the egg whites will be easier and cause less deflation.
 |
The pastry cream has lightened in color after the incorporation of the first batch of sacrificial egg white meringue.
|
Here is a photo of the completed Chiboust cream with all the egg whites folded in. I confess this is the first time I've ever done anything like this (folding whipped egg whites in), and I cringed with every motion as I heard the fizzle of the bubbles in the egg whites popping, but even by the end of the process, the cream was light and perhaps my ginger motions were simply gentle enough as a result. Also, every time I do this, all I can hear is just
this scene. For reference, I found it easiest to fold by shoving my spatula vertically down to the bottom along one of the sides, scooping upwards slightly, and depositing towards the center, and turning the bowl a little clockwise to repeat the process again, progressing in a circular way along the edge of the bowl, digging to the bottom, and folding the stuff from below onto the top in the middle of the bowl.
 |
"Just...fold it in."
|
I spread some of the filling into the cooled puff-pastry-and-choux base, stopping at the inside of the choux perimeter. I then loaded up my piping bag with a coupler and as much of the remaining chiboust cream as would fit comfortably.
I piped the filling into the choux puffs first, after I poked a hole in the bottom of each with a chopstick. It was kind of odd to fill these because the lightness of the Chiboust made it difficult to gauge how much more filling they required (pastry cream is quite a bit heavier so it's easier to estimate when you're done filling). If you overfill, one of two things might happen: The cream will ooze back out of the hole on the bottom once you set the puff down and gravity causes the weight of the puff to rest on that bottom face, or you might find that there is a secret hole on the top of one of your puffs along the steamed cracks (as you can see in a few of these in the photo below, where pinpricks of cream are escaping along the seams). The one on the right with half of it covered in cream was when I dropped it into the bowl of cream by accident. I used about a third of the cream to fill all the puffs, knowing I had plenty left for the rest of the cake. I set the bag aside to work on adding the cream puffs.
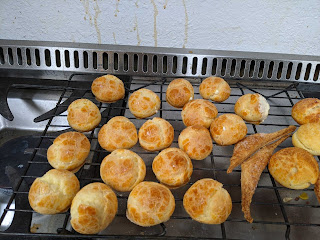 |
Filled choux puffs, with some evidence of holes along the seams (and one set of butterfingers)
|
I chose to make the topping in a shallow pan so it would be easier to dip the cream puffs without touching the rim of a deeper saucepan. The Book asks for the sugar caramel topping to be made in two steps. First, a portion of the sugar is melted with water until it caramelizes, and then the rest of the sugar is added in. I'm not sure the purpose of this, but I found it very difficult to get the second addition of sugar to dissolve. It took a lot of stirring, and I kept being paranoid I would burn the sugar on the edges from the first batch.
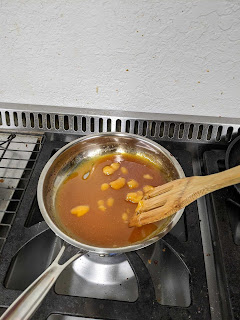 |
I was panicking trying to dissolve the second batch of sugar in the already caramelized sugar of the first batch
|
Eventually, all of the sugar dissolved and the caramel clarified to a glossy dark amber instead of being a slightly murky light amber. It held its shape briefly after a spoon swipe but would flow back into a puddle readily.
 |
We got there, eventually. Look at that delicious color!
|
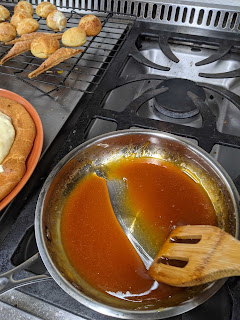
Then it was time to dip all the puffs in the hot caramel, first on top, then on bottom, and then moving quickly to use the bottom caramel to glue the puffs to the outer choux rim on the cake base. I burned my fingertips a lot in the beginning but eventually figured out that because the sugar would be runny when I first dipped the top, I could prevent it from dripping onto my fingers when I dipped the bottom by simply holding it up and letting it roll around to form an even cap before I attempted dipping the bottom. It was also important to not dip the top too far in, and leave enough of a band around the bottom hemisphere of the puff for me to hold onto when dipping the bottom. The bottoms of the puffs tended to have some of the cream squeeze out as I worked, and the cream would sizzle when it touched the hot sugar, but this was mostly not a problem unless they obscured too much of the bottom face for the caramel to stick to it. Finally, I had to reheat the caramel once during the process when it became too thick to coat the bottom of the puffs properly. I had a lot of leftover caramel, as I imagine the recipe wants to prevent burning fingers too much or needing to scrape up caramel from the pan with a delicate cream puff.
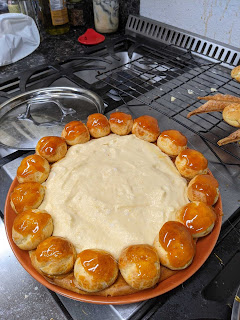
I squeezed a final puff onto the border to create a final perimeter of sixteen caramel glazed cream puffs around the pool of chiboust cream in the center. There were quite a few wispy strings of caramel floating around, so I snapped them off to clean up the appearance and put them back into the saucepan.
 |
I only burned my fingers about ten times dipping these.
|
Here is the coupler I mentioned earlier, where I have just swapped out the plain piping tip for the St Honore tip that I cleaned of practice pastry cream. A coupler is two pieces, one that is inserted inside the piping bag and has a threaded outside surface, and the other part is a nut with a hole slightly smaller than the base of a piping tip. The piping tip gets placed on the bag (over the bag and the inner coupler piece) and the outer piece is screwed over the piping tip onto the threads of the inner component, locking the piping tip in place. The benefit of a coupler is that it allows you to switch to a different piping tip for the same contents of the bag, so you don't have to empty the bag and fish out the tip before plopping in the new tip. This is perfect for a situation like this Chiboust cream, where the same filling is used in the cream puffs and in the top layer of waves, but one wants to avoid transferring the cream too many times to prevent deflating the delicate meringue before it gets a chance to set.
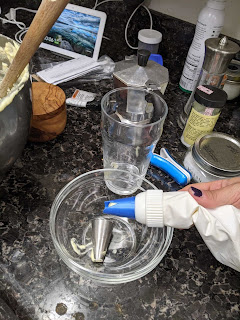 |
Used a coupler to let me swap out the two different piping tips I would need for the Chiboust
|
I piped the waves in small curves to create several rows of interlocking chevrons, so it looks like a few rows of braids running down the surface of the cake. The waves did not hold a peak as cleanly as the pastry cream did, or as in the example photos in The Book, and I suspect, while the recipe did not call for it, I should have refrigerated the cream for just a little bit of set before I tried piping. My cake base was completely cool by this time, so I doubt this was the problem, although my kitchen was a very comfortable temperature from all the baking. But the waves held their soft shape so I set the cake into the fridge overnight to chill, and set upon the monumental task of cleaning nearly every surface and tool in my kitchen that had been used for this baking whirlwind on a Sunday evening starting at 8pm (the caramelized sugar saucepan was the hardest to clean, even after I reheated the caramel and poured most of it onto a sheet of parchment to make caramel candy).
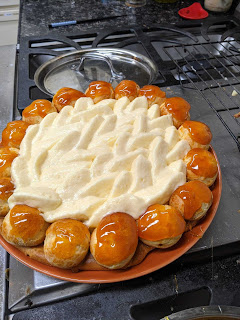 |
Not bad, not bad at all! Those caramel choux puffs are putting in work for the aesthetic
|
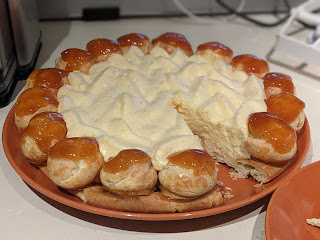
After a night of setting in the fridge, the gelatin had done its work and preserved the light mousse texture of the Chiboust cream. I cut a small slice for breakfast the next morning, and then cut another small slice because I wanted a better cross section view of the inside. You can see that the cream puffs have softened a bit but the caramel is still glossy.
 |
Hard to resist having this for breakfast.
|
And here is the closeup of the slice! The cream was lightly sweet with aromatic vanilla and small pops of vanilla bean, the puff pastry was a little moist but still light, and the puff pastry rings underneath, though not inflated, were not overly chewy, though I found their flavor to be much less interesting and rich than that of the recipe with milk and equal amounts salt and sugar. Finally, the cream puffs at the edge were the star of the show; the texture of the crunchy caramel paired with the tender thin choux pillows that yielded a pocket of melt-in-your-mouth Chiboust when bitten was an amazing bite to end the cake.
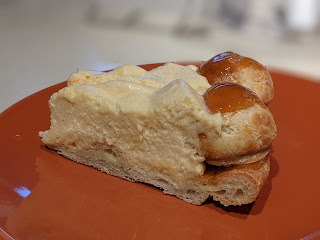 |
Look at those puff pastry layers, the mousse texture, the glossy caramel...
|
As a first attempt at a mousse cake of sorts, I'm pretty pleased, although, as my roommate pointed out, it was kind of a fake cake and mostly a stack of different pastries I had already made. But it's a notoriously hard cake to make look good and not like a pale kiddie pool, and considering I turned this out in a scant two hours after an exhausting weekend (I ran my first 6k Saturday night!), I am glad to have found this recipe and it is a capstone of sorts to what I have learned in my first chapter of patisserie.
Some assorted thoughts:
- Choux really does not do well with any interferences during baking. I should have known better!
- Next time I need to make sure to let a cake base bake on its own and deal with scraps later, saving time was not worth the integrity of my cake
- I liked the shape of these choux puffs better but I did not like the occasional holes from the cracking along the seams. I will try using a 3:1 water:milk ratio next time in choux to see if we can make a middle ground between these well-formed choux and the more elastic, flavorful ones from the previous recipe
- I should chill the Chiboust briefly, perhaps for an hour, before piping. Maybe I can set the bowl in the fridge right after I spread some in the middle of the cake.
- The 3D printed piping tip worked great!
- Despite the easier whisking of the larger egg yolks to dissolve the sugar, I could discern no difference in the final pastry cream product. So I think I will continue to use whatever eggs are readily available to me instead of stressing about the size of the yolks.
- The puff pastry being rolled out to nearly a sixteenth of an inch to compensate for shrinkage didn't seem to adversely affect the texture, so I just need to be gentle and chill/rest generously.
- Gelatin is not strictly vegetarian, and I want to experiment with agar in the future for setting the mousse.
- This recipe was not that hard, but it was a lot of equipment, utensils, surfaces, and clean up work.
Quote of the day: "your cake is so good i'm annoyed at my roommate for eating "his" slice because i wanted to eat it today"- quote from an unnamed friend, who I gave three slices of cake in total (one for them, one for roommate, one for partner)
No comments:
Post a Comment