 |
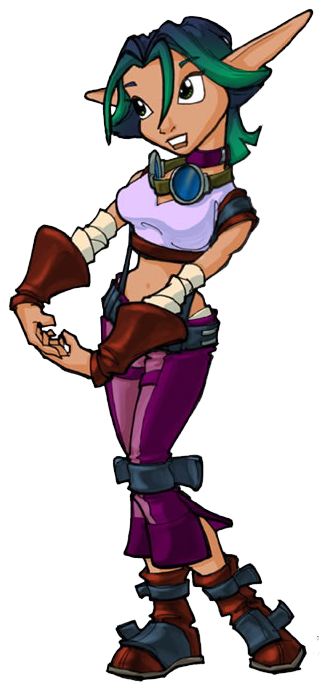
| Image from fanpop.com |
Like most of my cosplays, my student budget dictated a trip to the local thrift store, Garment District, where I went through their clothing-by-the-pound mountain and managed to find more or less the things I needed. I also picked up a brown handbag to cannibalize into the gauntlets.
 |
| I felt so awful buying those swishy magenta parachute pants. Why do those exist? |
 |
| Who needs waistbands when you have horribly impractical belt designs? |
Because the shirt was a little tight and I didn't want bra or pasty lines showing, and because I was going to crop it anyways, I folded the bottom part of the shirt underneath, effectively creating a second layer, and traced the collar onto the inside of the shirt so I could attach the original bottom hem, now folded up, to the inside of the collar, as shown.
 |
| Cosplay is a good diet motivator... |

Then, I used the remaining material that was unsewn on the fabric strip to attach to the bottom hem of the shirt.


A test fit before cutting and sewing the folded part of the shirt up to the collar. Opacity and bodycon seems to fare pretty well.

Onto the pants. Instead of doing inner layers like I did for my zer0 cosplay, I went the lazy route and just sewed the magenta patches onto the top of the pants (things were more low-res back in the day, nobody really knew where the patches were supposed to be, right?). I took the original waistband that I cut off, turned it backwards, and attached it to the new pants after taking in a few inches, adding the notch in the front and a really, really short zipper stub. This way, I could keep the belt loops, and I repurposed the belt from my zer0 cosplay and would eventually add the "belt" from the character design by threading it onto this hidden belt. Need some practical way to hold my pants up, after all.

Finally, I added the thigh straps using the ends of the material that I trimmed off the bottom of the pants while I was cropping them into capris.

In the next part, I'll do a hurried rundown of the accessories for the costume, which were poorly documented because that's how cosplay goes when it's senior last semester.
No comments:
Post a Comment