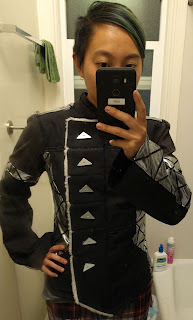
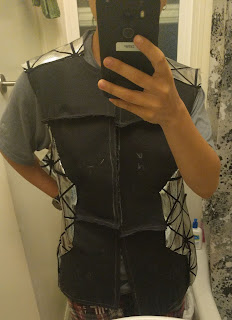
I've wanted to go to Burning Man for many years. Unfortunately, living on a student budget on the east coast made this mostly impossible. But after I moved to Berkeley for grad school, the community and opportunities were hard to escape. I applied for a Low Income ticket in April, after a longtime burner friend of mine convinced me to go, and, to my immense surprise and gratitude, was granted one. In July, this friend got in contact with the people who built Dr. Brainlove, and suddenly, I was on board as one of the core crew to build an art car (post on that forthcoming).
Two weeks in the desert loomed up in a month and a half, when I'd never been to a festival before or even gone camping for more than a weekend. And in the desert there are no coat checks; my usual strategy of multiple layers for warmth under a leather jacket against wind would probably be suboptimal for long nights that wavered between biking and dancing and sitting out in the open. I looked online for a while and hit up thrift stores, but didn't find a jacket that really met my needs and aesthetics. So I dusted off the Singer sewing machine my father gave me and made a custom jacket.
I started by sketching what I wanted the final jacket to look like, going through several iterations and drawing inspiration from a number of online resources. The qualities I wanted were sharp lines, asymmetry, a warm inner shell, and a stiff outer lining. Large sleeves, no hood, fur and silver accents.
Then I hit up the Goodwill and fabric stores. I found a short jacket that was way too large but had the collar and front hook closures that I wanted, and purchased matching canvas and an accent fabric in metallic silver Lycra. For the lining, I bought a secondhand black fleece pullover that was thick and fairly unworn and a thin fur jacket with large unseamed swaths. I tried to find articles of clothing that were oversized, because I was basically using them as fabric.
 |
| All the materials laid out and the lines drawn on the base jacket. |
After transferring my sketched lines to the base jacket and trying it on for fit, I laid butcher paper over the chalk lines and used a pin to perforate as a method of tracing. Then I connected the pinholes (harrowing connect the dots) and cut out the templates from paper, tracing them onto the black canvas fabric and leaving about half an inch for seaming allowance.
 |
| Outer shell pieces laid out, with lapel pieces overlapping the left side of the jacke |
 |
| Silver accent fabric laid out alongside outer shell panels |
After cutting out all of the torso shell panels, I stitched them together, leaving the seams visible from the outside for a more ragged apocalyptic look. The final torso piece became a very stiff vest with stretchy side and shoulder panels.
 |
| Outer torso shell complete, and conforming well to curves due to the lycra |
I attached the outer shell/vest to the original jacket, following the arm and collar seams as closely as possible to camouflage my additions.
For the sleeves, I went an even lazier route; I really hate sewing shoulders, because they are unreliably shaped and very difficult to match seams on, so I cut the sleeves of the original jacket off near the armpit, leaving a t-shirt looking structure, and tacked on sleeve tubes that I sewed.
A tip for sewing lycra; because the stretchy fabric will be pulled by the foot of the sewing machine and pucker, a strip of paper can be laid down over the lycra and sewn over (making a canvas/lycra/paper sandwich). Then, just tear the perforated paper off, leaving a nice flat seam with smooth fabric.
 |
| So flat! So straight! |
Next came the lapel panels. I cut matching sizes of fur and stitched little squares of fur-interfacing-canvas, picking the fur out of the seams once I flipped them right-side-out to make the edges fluffy. This was my first time using the buttonhole functionality on my sewing machine (the interfacing is to lend structure to the buttonholes), and they turned out well, after some de-MOOPing of fur and loose threads after cutting them open. I hand-stitched the lapel panels together, and then attached the strip to the original jacket shell.
 |
| Pretty proud of my first buttonholes |
As for the buttons, I couldn't find silver triangular buttons to match the accent fabric, so I drew up some buttons in SolidWorks and sent them to a waterjet. After some grinding off of tabs and finishing with scotchbrite polishing, I countersunk the holes to prevent the thread from being worn down by the aluminum edges.
 |
| Drawing for waterjetting buttons |
 |
| Finished button. The design may or may not have been somewhat influenced by my recent obsession with The Witness (incredibly vague and only barely spoilers) |
Finally, I added an inner shell by cannibalizing the fleece pullover I bought. I ripped apart the torso seams and laid it into the inside of the jacket shell to trace places to cut, and then stitched it to the existing side and shoulder/collar seams. For the sleeves, I left the original fleece sleeves intact, and attached the lining at the inside shoulders. After pressing open the outer shell seams with an iron and picking out any loose threads, I sewed fairy lights to the arms and back tail of the jacket.
The rainfly on the back of the jacket was purposefully left unsewn on the bottom edge. This, plus the extra width on either side, allowed me to freely move my arms forward so that I could reach the handlebars of a bike comfortably. While I was designing the back, I also decided to add double vents to the tailpiece, for ease of movement.
You can see the original upper arms of the jacket below, as they are slightly different from the new black canvas. But after two weeks of playa, everything was dust colored (but intact!).
 |
| The end product, buttoned up to the neck |


No comments:
Post a Comment