I had an abundance of oranges from my produce box that I wanted to use up before heading out for a month of travel coming up, so I decided to make marmalade, and what better use for a tiny batch of marmalade than as filling for another batch of macarons?
I was also excited to try making macarons in my kitchen this time, without my friend's helpful guidance, to see if I had learned anything from our previous collaboration.
I don't have a whole lot of photos from the marmalade process, because my focus on this journey is on the patisserie, but the basic gist is that I riffed on this recipe from David Lebovitz using five oranges and a lemon. Because I was going to be using the filling in macarons, I used a zester instead of cutting up the peel, so the resulting bits of marmalade would be smaller.
 |
| Zested oranges and a lemon for marmalade |
|
I juiced the fruit into the zest, and I put the remaining pulp and seeds in a cheesecloth to simmer with the zest, juice, and 2c water and 1.5c sugar. It boiled down to about half a cup of marmalade, which I then stuck into the fridge to chill overnight.
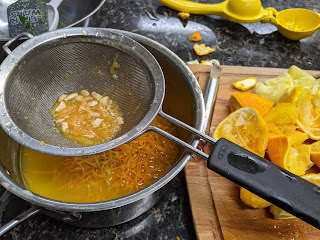 |
Juiced the fruit, and strained the pulp and seeds to add in a cheesecloth to simmer along
|
The next day, I started on my macarons. In the photo, I've got half the egg whites beating with hot sugar syrup into Italian meringue, while I have my other half of the egg whites ready to mix with the flour and confectioner's sugar sifted together in the back.
 |
Love a simple mise-en-place: meringue, egg whites, and the mixing bowl of dry ingredients
|
Here's the egg-white and almond-sugar paste.
 |
The almond paste was a little more liquid this time but still fairly stiff
|
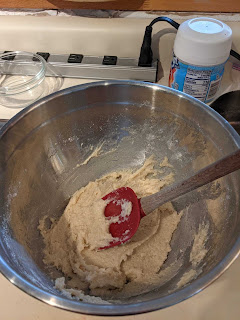
I tried to color these macarons lightly orange, but the color came out more pink. My Italian meringue was also quite thick, almost like marshmallow, and I fear I may have overwhipped it. I mixed in the sacrificial third of the meringue to loosen up the almond paste mixture. I'm not exactly sure why this recipe requires making an almond paste rather than just folding in the egg white meringue into the dry ingredients, but I suppose this makes for a more even consistency without possibility of undermixed dry spots. However, the amount of mixing to deflate the stable Italian meringue has kind of de-risked that situation.
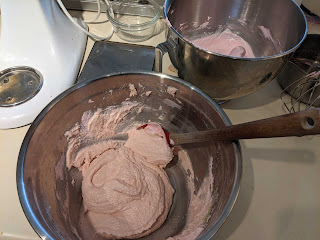 |
First part of the Italian meringue mixed into the almond paste
|
My macaron batter was still pretty fluffy but was falling off the spatula, so I figured it would deflate some more as I piped.
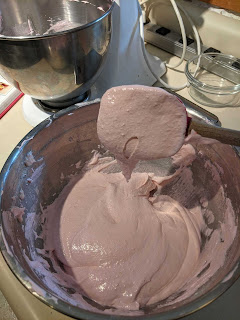 |
Macaron batter, which seemed too glossy and thick to be correct (and more pink than orange)
|
I printed off some macaron piping templates, which I slipped underneath the parchment paper so I could see them while I piped on the trays. Using the piping method I learned last time, I held the piping bag perpendicular to the tray and held the tip about 5mm from the surface of the parchment, drawing up slightly and making a quick swirling motion at the end to break off the stream of batter.
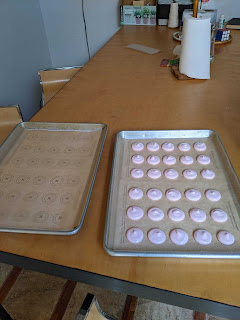 |
Piping macarons using a printed template I placed underneath the parchment
|
You can see two issues with the piped trays below.
- The macarons are very close together in their rows! I was suspect of this template, and I think, combined with the flowing of the batter, they spread a little too far.
- There's little peaks on almost all the macarons. I smoothed these down with a damp finger, but I believe this shouldn't really be so pronounced of a feature regardless.
 |
The recipe yielded two trays and a few extra macarons, and I had a lot of remaining peaks to smooth down with the tap of a damp finger
|
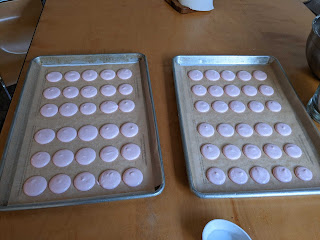
I rapped the trays on the table a few times to get rid of bubbles and popped them in the convection oven for 12 minutes per tray, rotating halfway through the baking time. The second tray ended up resting just by virtue of the baking time. My first batch came out fairly hollow, but with feet. I could have baked them for slightly less long; I think my experience with the insulating silicone mat was coloring my baking time expectations.
 |
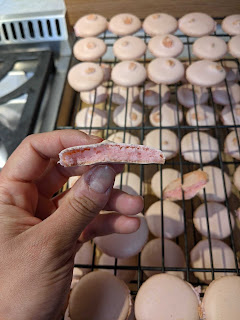
Cross section view of a nippled macaron from the first batch. Notice that the batter didn't really rupture into the nipple, it just seemed like the air escaped through there.
|
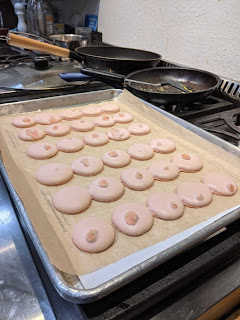
You can see on the bottom that my concerns that the macarons would spread and touch was not unfounded. The bigger issue, however, was that there were nipples on a bunch of them! So many more than last time we tried this recipe! This seemed to rule out piping and remaining bubbles as the culprit.
 |
About half of the first tray had nipples, and the bottom row was piped too close/spread too much and flowed into each other
|
My second tray was even worse, with very few macarons whose insides had not erupted from a hole on the top. This was a little suspicious, and after thinking about it for a moment, I believe what happened is related to using water to smooth the peaks. The internet confirms this; the additional moisture can disrupt the formation of the shell on top, so as the cookie bakes, the air ends up escaping through the point with the least resistance. A damp finger to smooth the tips of the cookies is a commonly-recommended action, so either I used too much water, or I should just avoid doing it altogether.
 |
| Not loving the ratio of nice-to-nipply macarons in the second tray. |
The second batch tended to be a little fuller, however, which was kind of confusing. Again, the method in the next step of making a thumbprint divot in each shell helps mask the hollowness of any shells, so this was not a high priority for me compared to figuring out the ruptures, but I hope to tackle the fullness of the shells in a future bake.
 |
The second tray was inexplicably more "full" than the first
|
It was time to fill the cooled shells! You can see that the baking tray may have been a little too low in the oven, as the bottom of many of the shells were browned, and they were a little more crisp than they should have been. I tried to pair them both by size and by having at least one of the two being un-nippled, so that each assembled cookie would be able to lie flat on one side at least! And then I set to the task of pressing the divot into the underside of each cookie to accommodate filling.
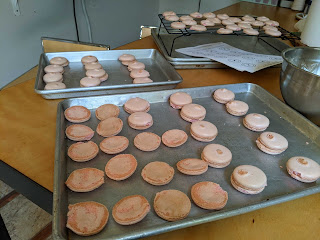 |
Paired off and pressed with a thumb for filling. The bottoms of the shells are a little brown, indicating too high of a temperature or tray too close to the heating element in the oven.
|
I used the pastry cream recipe from one of the macaron recipes in the book. Macaron fillings are a little more sensitive to consistency than something like a profiterole or a tart because they have no external support and also are subject to additional pressure from the weight of the cookie. In fact, the filling has to be stable enough to hold the two halves together and hopefully keep them from moving relative to each other! So the thumbprint divots help somewhat in this regard, but this is the reason I chose to use the pastry cream recipe in the macaron recipe, rather than the default one. This recipe included flour as well as cornstarch (because cornstarch will thicken into a gel but flour actually creates structure and thus stiffness). As you can see in the photo, the cream is almost raggedy instead of smooth flowing, and quite stiff when stirred.
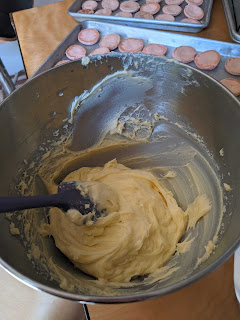 |
Made a very firm pastry cream for filling the macarons
|
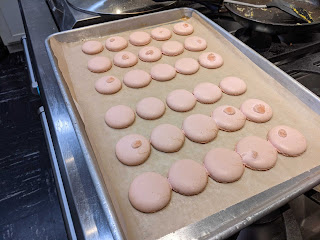
I piped a ring of pastry cream onto one half of the macaron pairs (you can tell I was having a hard time remembering to only pipe onto every other column) and then I piped marmalade into the center of each pastry cream ring. Using a piping bag for the marmalade was a mistake. The marmalade was thinner than I anticipated, and the long shards of zest sometimes clogged the piping tip, so I ended up dribbling a lot of marmalade liquid everywhere and awkwardly pulling out strands of zest with a chopstick to deposit on the macarons.
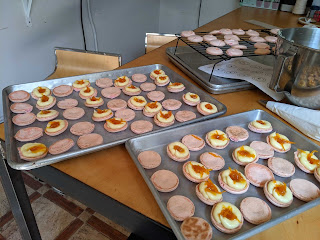 |
Macarons filled with a ring of pastry cream and a center of orange marmalade
|
But at least they looked okay! The feet were pronounced, and when the macarons were flipped over to rest on the nippled sides, they looked pretty presentable.
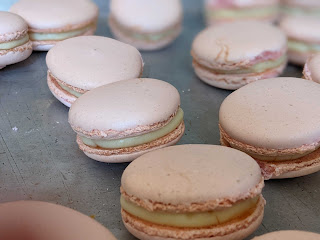 |
Assembled macarons with the nipples facing down (like little abstracted pigs)
|
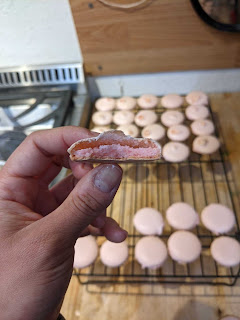
After a day of rest in the fridge, they had mellowed somewhat; the shell was firm on the outside but not crunchy, the body of the shells were moist, and the mild vanilla pastry cream and bittersweet citrus marmalade were like a fancy creamsicle flavor.
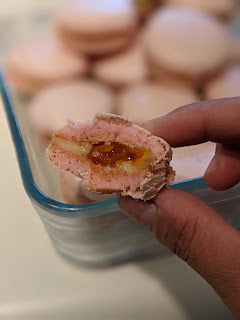 |
Cross section! The marmalade absorbed nicely into the shells and the pastry cream helped set the cookies, so they didn't drip everywhere or squish sideways when bitten
|
Some thoughts from my second macaron adventure:
- I think I am still not doing enough macaronage, and a slightly more liquid batter would eliminate needing to depress any peaks remaining in the piped macarons.
- I'm fairly confident the nipples are caused by the wet fingertip depressing the peaks, so my goal next time is to avoid doing that and see what happens.
- I need to find another template, this one just ends up with macarons a little too close for comfort, especially if I'm going to be doing more macaronage for a thinner batter.
- I wonder if the baking sheet position within the oven is part of the reason I'm having hollow shells? But the slow-baked macarons from the silicone mat last time also had the hollow shell issue. Jury's still out on this one, though the internet says that undermixing might also be a culprit, so hopefully improving my macaronage will solve this.
- I'd like to try piping slightly smaller macarons (1.5in, instead of the 2in in the recipe) for single fillings, because the cookies are a little sweet. My first experience with macarons was with Luxemburgerli from the Swiss candy brand Sprüngli, which are tiny 1" macarons that are a delightful bite-size confection. In comparison, the macarons I've been making recently all seem comically large, though I know they are the more standard size. I'll have to be careful about baking times if I reduce size, so maybe I will wait to make the size modification until I've improved my overall result at the size stated in the recipe first.
- The macarons, when fully baked, peel very cleanly off of the parchment if they are able to cool a bit before removal. If I grab the whole parchment sheet of macarons off the tray and let them cool on a rack, then remove the macarons, I'm able to get clean parchment to reuse for the next time I make them, which makes me feel way less bad about not using reusable silicone mats.
- If I make a marmalade filling again, I should make sure to finely chop the zest and get a thicker consistency in the jam to make it easier to pipe. Or I could use a spoon, though the zest should be more finely chopped regardless to be more compatible with the form factor of the pastry.
- I need to figure out how liberal I can be with the gel food coloring application to get the colors I want. I'm not a big fan of the super-vibrant colors of some macaron shells, but since the colors fade a little during baking, I need to at least achieve higher saturation for a pastel final result, rather than this seltzer-flavor-vibe.
Quote of the week: "these are the best macarons i've had...i've been to laduree in paris" - a pastry-loving friend who has given me reliable feedback for all of my creations despite my humble attempts to deflect praise.


No comments:
Post a Comment