One week into my regimented study of patisserie, and I'm already mixing things up a bit. Due to the apple excess in my house and the fact that my smaller tart rings were not slated to arrive until later this week, I thought I would go ahead and skip to an "Advanced" recipe for Tourte Landaise, or an apple strudel tart.
Strudel pastry: Thin, unleavened sheets of elastic dough roughly the thickness of phyllo. Usually contains flour, oil, and some salt; this recipe included an egg and cold water as well.
Firstly, this recipe makes 2 9" tarts. Who needs that many tarts? I set out with the intent to split the dough into halves before the resting step so I could freeze one half for a later date.
I decided to use my stand mixer for mixing, which was one of the options given in the recipe, because the dough looked like it would be sticky at first and require a fair amount of kneading for the gluten formation to create adequate stretching ability.
A note on flour age: Up to this point, I have mostly been using the leftover flour from the 50lb bag in our pantry. I had no way of knowing how old this flour was, but it was at least 8 months old (and probably more). I've noticed in the past that flour more than a year old definitely has issues with either water absorption or gluten formation (which are related for reasons easily explainable). So, knowing that this recipe would require reliable gluten formation, I opted to use about 2/3 of my newly bought flour from last week, and only use 1/3 "old flour". I'll try to use up the rest of the old flour in recipes like tarts and puff pastry where the dough is not as sensitive or needs as much manual stretching.
I find that most doughs are ready once they leave my stand mixer bowl clean, grabbing all the bits from the sides as they are kneaded on the hook. I found that this dough relaxed very readily, so I worked it quite hard by hand until it was very stiff before proceeding so it wouldn't stick too much.
 |
| Kneaded strudel dough looking pretty much like the images in The Book |
 |
| Oh to be a nice dough ball resting in a bath of oil... |
After the seven minute bath was done, I separated the dough into two balls of the same weight. My precision in separating them came back to bite me, which I will describe later. Suffice to say, it would have been better if I'd made one cut down the middle with a pastry cutter and been done with it, instead of snipping pieces off of the heavier ball to tack onto the smaller one until they were exactly the same weight. I put one ball in a ziploc bag and labeled it with the pastry name and date to stick in the freezer, and placed the other one back in the bowl and covered it with plastic wrap to rest in the fridge.
Meanwhile, I clarified the butter, which would later be used to brush the pastry sheets. The recipe mentions that while normal butter will work, clarified butter will not burn as it bakes. The book recommends using no less than 250g of butter at a time for clarifying, and after putting only 80g in my smallest saucepan, I could see why: it's much easier to skim the foam off of the top once it's melted if your butter pool is deeper.
 |
| Melted butter in the process of being skimmed |
 |
| Clarified butter poured into a ramekin, leaving the remaining solids in the bottom of the saucepan |
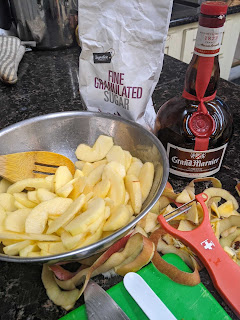 |
| Peeled and sliced apples. Shout out to the world's best peeler, a rando plastic Y from the generic grocery store in Switzerland. 4 years and counting baybee |
Setting the apples aside, I prepared my largest cutting board for stretching the dough by spreading a light layer of flour all around it. The Book calls for final stretch dimensions of 48x30". That's really large! The cutting board I had was roughly 24x16", so about half the size of the final dimensions, and I cut the rested dough ball into two pieces to work separately, leaving the other one under plastic wrap while I worked.
 |
| Lightly floured cutting board and half (of half) of the dough in preparation for stretching |
I'll be honest: I did not think this would work. I was highly concerned at my ability to stretch that little blob of dough into a translucent sheet covering this entire surface. But this dough is both Strong and Stretchy. Stronchy, if you will. Much more so than I expected. It got easier to stretch as it warmed as well.
After flattening the dough out into a rough rectangle, I started by stretching the dough in the air, letting it drape down around my fingers like pizza dough, and once it got too large, I set it down and began stretching gently from the middle out towards the edges, lifting up and out from under the dough with my fingers as pictured below. I was very cautious as I first worked, but I was surprised to find the dough very willing to stretch and not tear. I noticed that it was more reliable to try and get an uniform thinness instead of working one spot thin at a time, in order to reduce the possibility of stress concentrations forming in the thinner portions of the membrane as I worked. Avoiding folds or immediately unfolding the dough if it overlaps is imperative; if it doubles back on itself for too long, it will stick to itself and then be nigh impossible to restretch evenly because a very thin region will then be next to a region twice its thickness (or more), and this will create a curbed edge that is likely to tear at the border.
In the image below, you can see some "webbing" happening. These regions are not entirely due to uneven stretching; rather, they correspond to places where I tacked on the extra dough while I was first splitting the dough into two even balls after the oil soak. I believe the layer of oil prevented these nubbins from reintegrating well into the bulk of the dough. In the future, I suggest a clean cut and a very round ball prior to oiling, to prevent these webbed regions from occurring, as they are difficult to stretch evenly.
 |
| STRONCHYYY. I am very pleased with the thinness of this sheet. |
I brushed a layer of clarified butter onto the stretched dough and sprinkled some granulated sugar across the area. I had to warm the clarified butter prior to brushing, since it solidifies more readily than nonclarified butter. I forgot to spread the butter onto the second sheet before cutting, and this was a Bad Time, as the squares slid around on even the light layer of flour and got dragged into pleats when I tried to brush butter on. So, cook by The Book and don't forget to do everything before cutting.
When cutting into squares, I had to make sure to cut cleanly all the way to the edges of the dough; any unsevered points would drag the neighboring square along, creating the undesirable sticky pleats. The Book said to not worry about small tears happening, as they would not be visible in the end product, and indeed, everything turned out fine! I cut 10 squares total (6 from the first sheet, 4 from the second), using eight of them, sugared side up, to line a removable bottom 9.5" tart pan with some overhang on the edges.
By the time I was ready to layer on the apples, they had exuded quite a bit of liquid from macerating, and I tried my best to leave that liquid in the bowl and fish only apple slices out so that no extra sogginess would be introduced (you can bet I drank whatever was left in the bowl though). I folded the overhanging edges of the bottom squares around the apple pile and draped the remaining two squares of dough on top (sugar side down, though The Book did not specify orientation), and I tried to artfully twist the corners together so they created light peaks and pleats like the reference photo. I did not get as structural of peaks as in the sample photo, and while I don't know why, I'm not bothered by it, since it seemed to cook pretty evenly and still be crisp. I sifted a generous amount of powdered sugar over everything, and set it onto a baking sheet to put into the oven.
 |
| Tart filled with apples, draped with dough, and dusted with powdered sugar. |
I baked this tart with the convection fan on, having learned from my previous baking, and thirty minutes later, it was evenly golden brown on top. I was surprised the powdered sugar had not entirely melted into the tart; I had been surprised that the recipe called for the dusting prior to baking, but I should not have doubted The Book. I could probably be even more liberal with the dusting next time. As seen in the pan beneath the tart, a significant amount of apple juice and butter had leaked from the pan and was caramelizing happily on the sheet pan. I think my choice of a removable bottom tart pan is pretty vital, both for tart removal and for situations like this, where my tart would indubitably be swimming in sweet juices and soggy on the bottom otherwise.
 |
| Baked tart; the sheet pan was absolutely necessary for catching all the juices that leaked out. |
 |
| Tart demolded from the edge of the pan |
 |
| Cross-cut shot! Look at those layers! Look at that clean cut! Don't look at the bad apple in the background! I only used good apples in this tart, I promise! |
A few more odds-and-ends observations:
- I should really have cut my nails before attempting stretching. They were on the longer side since I had just removed a manicure and was letting them recover a bit, but there were definitely parts of the dough I stretched thinner than I intended because of the additional tension the nails introduced.
- Remember to label ziploc bags/plastic wrap before handling things to put into them! Oily plastic is really hard to write on with permanent marker, plus for things like egg whites, the surface will be too jiggly once filled.
- Loose pleats and tucks yielded the best air pockets and thus crispiest crust, though I think the juxtaposition of regions of varied crispness was also quite tasty.
- The apple filling, while delicate, might have benefited from a dash of nutmeg or clove? Though it would have to be incorporated either as a ground spice or steeped in the liqueur prior to macerating. Traditional strudel tends to have raisins, or something else to break up the straight apple filling.
Quote of the day: "Clarified butter? Isn't that just ghee?" - My roommate Rich, when I told him I was busy being extra clarifying butter and could not answer the door.
No comments:
Post a Comment